TM 9-2320-366-34-2
13-47. V-ROD CONTROL ARM REPLACEMENT
This task covers:
a. Front Removal
b. Front Installation
c. Rear Removal
d. Rear Installation
e. Follow-On Maintenance
INITIAL SETUP
Equipment Conditions
Engine shut down (TM 9-2320-366-10-1).
Driveshaft removed (TM 9-2320-366-20-4).
Tools and Special Tools
Tool Kit, Genl Mech (Item 78, Appendix B)
Goggles, Industrial (Item 28, Appendix B)
Wrench, Torque, 0-175 lb-ft (Item 92, Appendix B)
Multiplier, Torque Wrench (Item 42, Appendix B)
Wrench, Torque, 0-600 lb-ft (Item 60, Appendix C)
Socket, Socket Wrench (Item 72.1, TM 9-2320-366-20
Appendix B)
Materials/Parts
Antiseize Compound (Item 12, Appendix C)
Nut, Self-Locking (Item 220, Appendix F)
WARNING
Wear appropriate eye protection when
working under vehicle due to the
possibility of falling debris.
Failure to
comply may result in injury to personnel.
a. Front Removal.
CAUTION
Do not use a pneumatic wrench to remove
nuts, bolts from V-rod. Thread damage will
occur.
Failure to comply may result in
damage to equipment.
NOTE
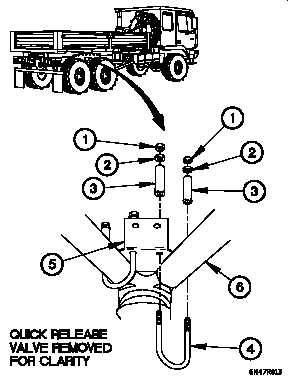
Intermediate and rear axle quick release
valve brackets are removed the same way.
Intermediate axle quick release valve bracket
shown.
(1) Remove four nuts (1), washers (2), spacers (3), two U-
bolts (4), and bracket (5) from V-rod control arm (6).
(2) Position bracket (5) to allow access.
13-416
Change 1


